Setting Up the Android Development Environment

For a long time, I resisted buying a smart phone because the data plans were so expensive.  I had been using a T-Mobile prepaid plan on a basic phone that worked out to 10¢ a minute.  I was paying about $20 a month, no thanks to unwelcome solicitors.  Getting phone service from a major carrier would have meant facing a phone bill that was suddenly $80 a month or more.  That would have been a 400% increase in my phone expenses.  When Metro PCS recently offered a smart phone plan for $30 a month, it finally made sense to consider one.  My phone expense would only jump $10 a month or 50%.  Not so bad.  I went in and got myself set up with an LG Motion 4G phone with the Ice Cream Sandwich version of the Android operating system.  I very quickly fell in love with it.

Now that I have a smart phone, I’m coming up with all kinds of ideas for apps that should be on it.  A couple of them are related to little side jobs that I do.  I’ve looked online for the type of app I need, but there were really only a couple of options, and one of them turned out to be highly unreliable.  (I’ll get into that in a later post since the type of unreliability I encountered is the sort of thing a good professional programmer needs to keep in mind when designing and coding an app.)  The lack of applicable apps indicated to me that there might actually be a viable market for what I had in mind, even if it was niche market.  So I decided to write Android apps with the intention of actually marketing them.

The Android SDK can be set up in Windows, Mac OS, or Linux. I have Windows computers, so the following will be most relevant to those with Windows computers.

I’m a visual learner, so I like videos. I found this great video on how to set up an Android development environment on Windows 8 on YouTube. Thank you, Mark Fleming. You can find similar tutorials on his YouTube channel.

Before you get started, the Android developer site has a nice introduction to the features of the Eclipse IDE and Android SDK. You can find it here: http://developer.android.com/tools/index.html

The first step to getting set up is installing the Java JDK. You can find it by searching for “Java JDK” in a browser. Select the result on the oracle.com site. The path at the time of this writing is: http://www.oracle.com/technetwork/java/javase/downloads/jdk7-downloads-1880260.html

For my system, I selected my download from the list in the Java SE Development Kit 7u15 box. There are two options for Windows: a 32-bit version (Windows x86) and a 64-bit version (Windows x64). In deciding which to choose, keep in mind that if you install the 64-bit Java JDK, you will need to install the 64-bit Android SDK. Likewise, if you choose the 32-bit Java JDK, you will need to install the 32-bit Android SDK. Click the “Accept License Agreement” radio button and then click on the link for the download appropriate for your computer and run the installation.

After you have the Java JDK installed, you can install the Android SDK located on the developer.android.com site. At the time of this writing, the download page is at: http://developer.android.com/sdk/index.html

If you don’t already have Eclipse on your computer, then click the big blue button on the right side of the screen. Other installation options are available lower on the page. After you click the button to download, you will be asked to accept the terms and conditions. For Windows users, you must then select 32-bit or 64-bit. Remember, the one you select must match the version you selected for Java. Once you have done that, then you can click the big blue download button that will appear under your selections.

The Android SDK and Eclipse package come in a zip file. The package is quite large, so you may want to go get a cup of coffee while you wait for the download. When the download is done, extract all of the files. You can do the extraction in your download folder. The extraction will take quite a bit of time, too. You will end up with an adt-bundle-windows-x86_64 folder (if you installed the 64-bit version) with another adt-bundle-windows-x86_64 folder inside of that. You can then move the latter folder to wherever you want to run the programs from. When I installed on my Windows 8 system, I had issues with paths with spaces in them. It is recommended that you avoid folder names with spaces in them, so the usual “Program Files” folder may not be your best choice of locations. In my case, I created a new folder called AndroidDevelopment in my C: drive and moved the inner adt-bundle-windows-x86_64 folder to there.

At this point, you may want to create a shortcut on your desktop for the program. Within the adt-bundle-windows-x86_64 folder, go to the eclipse folder. Find eclipse.exe in the list. It has a purple icon. Right-click on eclipse.exe and then click Copy. Go to your desktop, right-click where you want your shortcut, and then click “Paste shortcut.”

You are now ready to run Eclipse.
Posted in Android | Tagged , , , | Leave a comment

Changing the HTML Editor for View Source in IE9

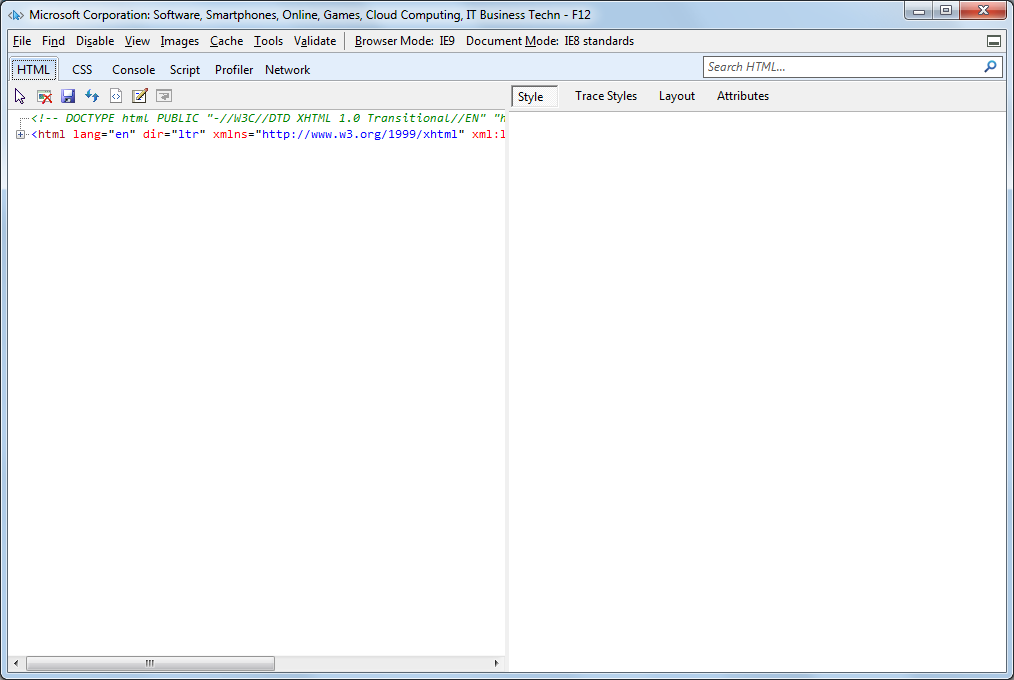
Let’s say that you would like to see the client side code for a web page you are viewing in Internet Explorer 9.  To do so, you would right-click the page and select View source.  This would pop up the default HTML editor containing your source.  This will likely be Notepad.  But what if you have some fancy programming editor that you would rather use?  You can set your View Source Editor in the F12 Developer Tools.

  1. Open Internet Explorer.
  2. Press F12 to bring up Developer Tools.
  3. In the File menu, select Customize Internet Explorer view source.
  4. Choose Other…
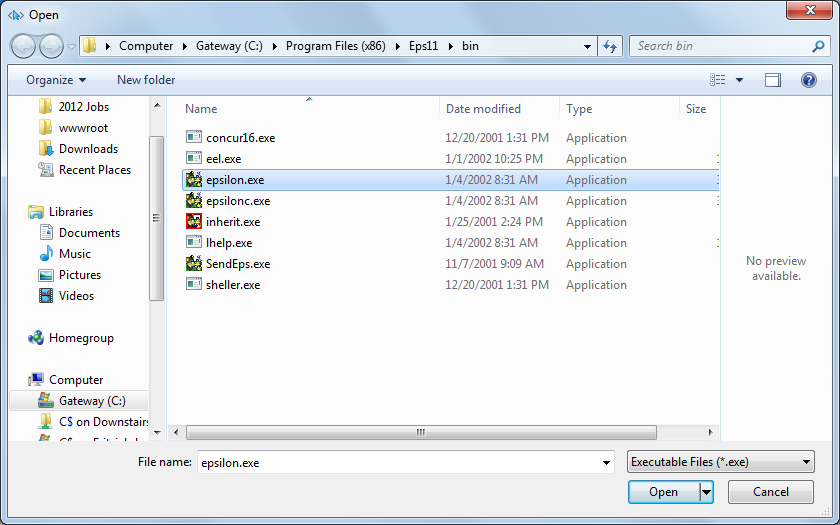
  5. This will bring up a file selection page.  Navigate to the path of your chosen program and select your program’s executable file.
  6. Click Open.
  7. You can then close Developer Tools.

Now when you right-click on a page and select View source, the page’s source should come up in your chosen line editor.

References:
http://msdn.microsoft.com/en-us/library/gg589512(v=VS.85).aspx
http://social.technet.microsoft.com/Forums/en-ZA/ieitprocurrentver/thread/d21165cb-1327-4f91-91dc-9df8e71016a7
http://www.freeemailtutorials.com/webBrowsingAndEmail/change-view-source-editor-in-internet-explorer-8.php

Posted in IE9 | Tagged , , | Leave a comment

DOCTYPE Declarations

The first thing that should be in your HTML files is a DOCTYPE declaration.  In the past, I have simply copied them when I have used them at all, without really thinking about what was in them.  Today, I have decided to take a closer look.  At first glance at the W3C Recommended list of Doctype declarations page, it would seem that simply copying a standard DOCTYPE is the thing to do if you are writing an HTML page.  The page states that exact spelling and case are important.

There is a wide range of possible standard DOCTYPE declarations available.  For HTML 4.01, there are three: Strict, Traditional, and Frameset.

If you leave out your DOCTYPE declaration, the default is HTML 4.01 Strict Document Type, according to W3C.  This one disallows deprecated elements and attributes.  It “…excludes the presentation attributes and elements the World Wide Web Consortium (W3C) expects to phase out as support for style sheets matures.”  It might be a good idea to use Strict elements and attributes if you would like to eventually transition to HTML 5, which is as yet not a standard.  You can determine which elements are deprecated by checking the Index of Elements page.  Likewise, deprecated attributes can be identified on the Index of Attributes page.  Look in the Depr. Column for a D.  The Strict DOCTYPE declaration is as follows:

<!DOCTYPE HTML PUBLIC "-//W3C//DTD HTML 4.01//EN"
     "http://www.w3.org/TR/html4/strict.dtd">

If you need to accommodate deprecated elements and attributes, you can use the HTML 4.01 Transitional Document Type.  This one allows you to use deprecated elements and attributes but does not allow frames.  The Transitional DOCTYPE declaration is as follows:

<!DOCTYPE HTML PUBLIC "-//W3C//DTD HTML 4.01 Transitional//EN"
     "http://www.w3.org/TR/html4/loose.dtd">

If you are determined to use frames, then you can use the Frameset declaration as follows:

<!DOCTYPE HTML PUBLIC "-//W3C//DTD HTML 4.01 Frameset//EN"
     "http://www.w3.org/TR/html4/frameset.dtd">

I noticed that frames and deprecated elements and attributes worked on my test pages even when I declared the pages as Strict.  If you really want to know if your pages conform to your chosen type, you can validate your HTML files using the W3C Markup Validation Service.  One note about using this service:  In addition to requiring the DOCTYPE declaration, it will also flag an error if you fail to declare your character set.  You can do that by including the following in your HTML file:

<HEAD>
<META http-equiv="content-type"
     content="text/html;charset=utf-8">
</HEAD>

Now let’s tease out what the various parts of the DOCTYPE declaration really mean.  The general syntax for DOCTYPE is

<!DOCTYPE root-element PUBLIC "FPI" ["URI"] [
     <!-- internal subset declarations -->
]>

or

<!DOCTYPE root-element SYSTEM "URI" [
     <!-- internal subset declarations -->
]>

If you use HTML as the root-element and don’t declare anything else, you will invoke the HTML 5 version of the DTD, which is as yet non-standard.  Some other standard root-elements include MATH and SVG.  When DOCTYPE declarations are used in XML files, you can declare a custom root-element.  Like <HTML>, this custom root-element will surround the contents of the page.  For instance, you may have the following:

<?xml version="1.0" standalone="no" ?>
<!DOCTYPE memo SYSTEM "memo.dtd">
<memo>
</memo>

PUBLIC or SYSTEM declares where the definition of the document type resides.  If it is PUBLIC, then it is a publicly accessible object.  This is the default.  Those standard HTML DOCTYPE declarations are all PUBLIC.  Their definitions reside where anyone can get to them.  If SYSTEM is declared, then the document type is a system resource, such as a local file or URL.

The FPI used with a PUBLIC declaration is a string which identifies the owner and the particular document identified by the FPI.  In the case of "-//W3C//DTD HTML 4.01//EN", the owner is "-//W3C", and the document is "DTD HTML 4.01//EN".  FPI is not used with SYSTEM.

The URI identifies where a Document Type Definition (DTD) file defining the document type is located.  Describing the contents of this file is beyond the scope of this post.  Information about DTD can be found in the Wikipedia post, Document Type Definition.

DOCTYPE declarations also allow DTD statements to be placed directly into the declaration.  The following are examples of this:

<?xml version="1.0" standalone="yes" ?>
<!DOCTYPE foo [
     <!ELEMENT foo (#PCDATA)>
]>
<foo>Hello World.</foo>

and

<?xml version="1.0" standalone="no" ?>
<!DOCTYPE document SYSTEM "subjects.dtd" [
     <!ATTLIST assessment assessment_type (exam | assignment | prac)>
     <!ELEMENT results (#PCDATA)>
]>

References:
http://www.w3.org/QA/2002/04/valid-dtd-list.html
http://www.w3.org/TR/html401/struct/global.html#idx-document_type_declaration-3
http://www.w3.org/TR/html401/index/elements.html
http://www.w3.org/TR/html401/index/attributes.html
http://validator.w3.org/
http://en.wikipedia.org/wiki/Doctype
http://xmlwriter.net/xml_guide/doctype_declaration.shtml
http://msdn.microsoft.com/en-us/library/ie/ms535242(v=vs.85).aspx
http://en.wikipedia.org/wiki/Document_Type_Definition

Posted in HTML, XML | Tagged , , | Leave a comment

Displaying the Correct Time for Your Time Zone

Let’s say that you want to display the time on your HTML page.  You could do it like this in test.html:

<html>
<body>
<!--#config timefmt="%I:%M %p %Z" -->
<p><!--#echo var="DATE_LOCAL"--></p>
</body>
</html>

That works fine as long as your ISP is in the same time zone as you are.  But what if it isn’t?  You could try changing the time zone in .htaccess like so:

SetEnv TZ America/Los_Angeles

Unfortunately, this does not work with SSI directives, at least not on my host.  The above test.html file will display 08:02 PM CDT because my host is in Texas.  The above SetEnv does, however, work with PHP.  Fortunately, if you’re set on using HTML files, there’s a way to use SSI to call a PHP file.  The new test.html looks like this:

<html>
<body>
<p><!--#include file="display-local-time.php" --></p>
</body>
</html>

display-local-time.php looks like this:

<?php
echo date("g:i A T e");
?>

Now, test.html will display 6:02 PM PDT America/Los_Angeles.

References:
http://support.hostgator.com/articles/hosting-guide/hardware-software/can-i-change-the-server-clock-or-time-zone
You can find a list of supported time zones to set in your .htaccess file here: http://www.php.net/manual/en/timezones.php
The parameters for the PHP date function are listed on the reference page here: http://us.php.net/manual/en/function.date.php

Posted in Apache, HTML, PHP | Tagged , , , , , , | Leave a comment

Displaying a Copyright Year on an HTML Page

Let’s say that you’re building a large website in HTML.  The client wants to display a copyright declaration on each page of the site using the current year.  If the year is hard-coded on the site on each page, this would require yearly updates of each page on the site.  An easier option would be to take advantage of Server Side Includes (SSI) features.  This, of course, assumes that you have set up SSI on your server as described in my previous posts.

The solution looks like this:

<html>
<body>
<p>This page demonstrates how to display a copyright notice
   using the current year on the server.</p>
<!--#config timefmt="%Y" -->
<p>Copyright &copy; <!--#echo var="DATE_LOCAL"--></p>
</body>
</html>

This solution takes advantage of two SSI directives, config and echo, plus the system variable, DATE_LOCAL.

The echo directive allows you to display an HTTP environment variable.  Availability of a particular environment variable may depend on the server you are using.  DATE_LOCAL is available on both the Windows IIS server on my local machine and the Apache server on my ISP.  The default format displayed by <!--#echo var="DATE_LOCAL"--> will depend on how the system is set up.  On my Windows IIS server, the default looks like Wednesday April 18 2012.  On my ISP running Apache, it looks like Wednesday, 18-Apr-2012 11:20:38 CDT.  This, however, is not the format desired for the above scenario.

We can configure what format to use for the date by using the config SSI directive.  The following timestamp format codes are available.  In our example, we want just the year, so we’ll use %Y like this:
<!--#config timefmt="%Y" -->.

Value Description Example
%a Abbreviated weekday name Sun
%A Full weekday name Sunday
%b Abbreviated month name Feb
%B Full month name February
%c Standard date & time Mon Oct 22 11:21:55 2004
%d Day of month as digit 12
%H Hour number (24-hour clock) 22
%I Hour number (12-hour clock) 10
%j Day of the year as digit 047
%m Month as digit 06
%M Minute number 02
%p AM or PM PM
%S Second number 1071178029
%U Week number 05
%w Day of the week number (with Sunday as first day) 1
%x Date in standard format 01/12/05
%X Time in standard format 12:04:45
%y Two-digit year number 04
%Y Four-digit year 2004
%Z Time zone EST

References:
http://www.yourhtmlsource.com/sitemanagement/ssiecho.html
http://en.wikipedia.org/wiki/Server_Side_Includes
http://publib.boulder.ibm.com/iseries/v5r2/ic2924/info/rzaie/rzaieenvvar.htm

Posted in HTML | Tagged , , | Leave a comment

Turning on SSI in Apache on a Linux Server

Turning on Server Side Includes on my ISP’s Apache server turned out to be HTML quite easy.  All I needed to do was add the following lines to the .htaccess file in the directory where the pages reside:

Options +Includes
AddOutputFilter INCLUDES .html

The first line turns on Server Side Includes.  The second line maps the .html filename extension to the INCLUDES filter which will process the files.Watch Full Movie Online Streaming Online and Download

Now I can run my test HTML page with the include on my web SSI host.

References:
http://httpd.apache.org/docs/2.0/howto/ssi.html

Posted in Apache | Tagged , | Leave a comment

Turning on SSI in IIS on a Windows Server

If you are testing your HTML files with SSI calls on a Windows server, you will need to set options to allow SSI to be interpreted on the server side.  The following are the steps I took to set up SSI in IIS on my computer running Windows 7 Home Premium.

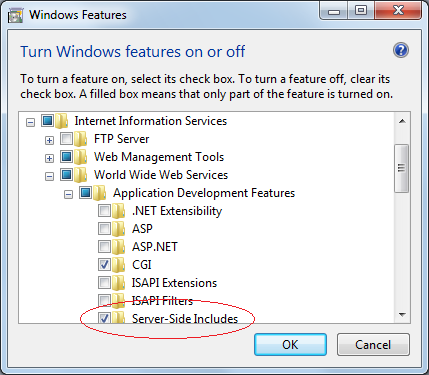
From the Start menu, click on Control Panel. (In Windows 10, type control panel in the search box to find it.)  Click on Programs.  Under Programs and Features, click on Turn Windows features on or off.

In Windows Features, expand Internet Information Services.  Expand World Wide Web Services.  Expand Application Development Features.  Check the Server-Side Includes box.  Then click OK at the bottom of the window.

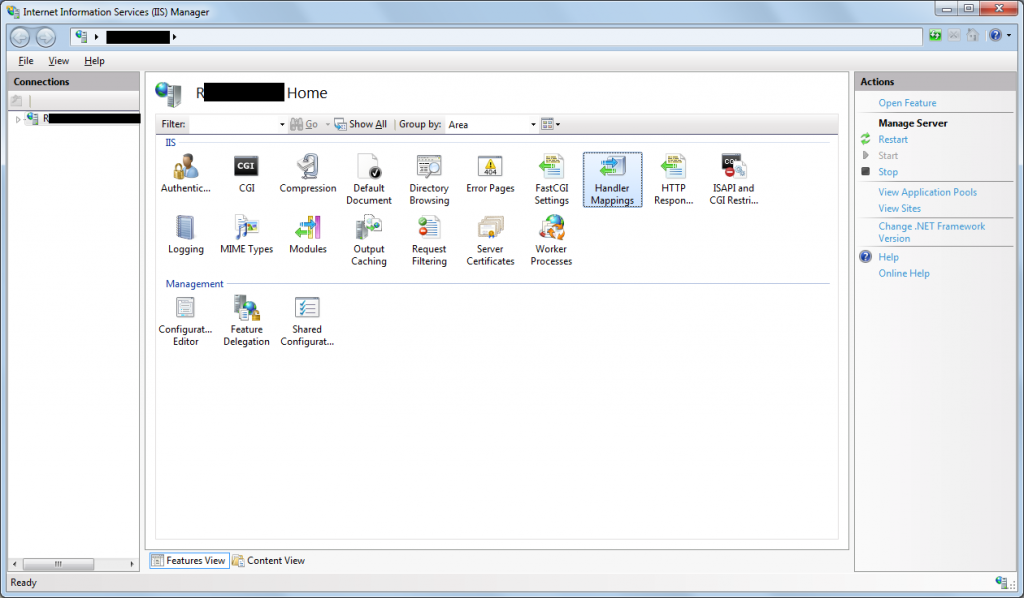
Then you need to go into the IIS manager.  Go to the Control Panel.  Click on System and Security.  Click on Administrative Tools.  Double-click on Internet Information Services (IIS) Manager to run it.

In the IIS Manager, double-click on Handler Mappings.

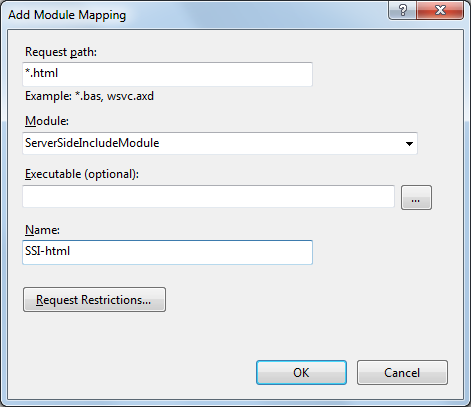
In the Actions pane, click on Add Module Mapping…  Fill in as follows:

Request path:  *.html
Module:  ServerSideIncludeModule
Name:  SSI-html

Click OK at the bottom of the window.

Now your HTML with the SSI include directive should work.

References:
http://tech.mikeal.com/blog1.php/server-side-includes-for-html-in-iis7
http://en.wikipedia.org/wiki/Server_Side_Includes

Posted in IIS | Tagged , , | 1 Comment

Including HTML Files in an HTML File

Let’s say that you are building a site with several different HTML pages.  You want them all to have the same template and menu structure.  This would require a lot of duplicated code in each page of the site.  Wouldn’t it be a lot nicer to have that duplicate code in files that can be included in your pages?  There actually is a way to do this, but it may require that you change options for Server Side Includes (SSI) on your server.  Those changes to the server will be covered in future posts.  For now, let’s look at how to do the include.

The following line will include the file test2.html into an HTML file.

<!--#include file="test2.html" -->

To test the concept of including one HTML file inside another, I wrote the following page, test.html:

<html>
<body>
<p>Before the include.</p>
<!--#include file="test2.html" -->
<p>After the include.</p>
</body>
</html>

test2.html contains the following:

<h1>Hello, World!</h1>

If your server is set up to accept SSI directives, you should see the following:

Before the include.

Hello, World!

After the include.

If you view the source from your browser, it will look like this:

<html>
<body>
<p>Before the include.</p>
<h1>Hello, World!</h1>

<p>After the include.</p>
</body>
</html>

The code from the included file will have been integrated on the server side into the code sent to the client.

If the server has not been correctly configured, you will not see “Hello, World!” in the browser.  So what do you do if this is the case?  I will cover that in the next two posts: Turning on SSI in IIS on a Windows Server and Turning on SSI in Apache on a Linux Server.

Posted in HTML | Tagged , , | Leave a comment

Getting Started with PHP

If you want to set up your Windows computer to test PHP pages, you will need to set up IIS first.  When I had Windows XP, I had to buy the Professional version of the operating system to get IIS.  IIS is included in Windows 7 Home Premium. You can find instructions for setting up IIS here:  Setting Up IIS 7.0 by Microsoft TechNet.  When you get done, you should have an inetpub directory in your hard drive’s root directory, and there should be a wwwroot directory within that (C:\inetpub\wwwroot).  The wwwroot directory is where you will put your HTML pages, your PHP pages, and anything else you want to test locally on your Web Server.

At this point, you can test to make sure that standard HTML pages are working properly.  You will need to know your computer’s name for the URL to your local pages (or localhost).  Go to the computer’s Control Panel.  (In Windows 10, type control panel in the search box to find it.)  Click on “System and Security”.  Click on “System”.  Your computer’s name should be listed on that page.  If you have an HTML test file named test.htm in your wwwroot directory, your URL for your browser should be: http://COMPUTERNAME/test.htm

<html>
<body>
<h1>Hello, world!</h1>
<p>This is a test of HTML.</p>
</body>
</html>

You can find the binaries on the PHP For Windows: Binaries and sources Releases page.  If you know the version of PHP that your Internet Service Provider (ISP) is using, it might be a good idea to install the version to match theirs.  The ISP for a site I set up for a friend recently upgraded their PHP installation, and there were some changes that had to be made to make the site run properly on the new version.  I’ll discuss some of the changes I needed to make in a future post.  Having matching versions can help prevent problems, at least until your ISP decides to upgrade.

You can find the instructions at the PHP: Installation on Windows systems – Manual page.  The two Windows Installer links will tell you how to install the binaries according to the version you have decided to use.  The installation process should set up the options in IIS that are needed for PHP to run.  If PHP does not run after installation, the Microsoft IIS links on the PHP: Installation on Windows systems – Manual page should help you get going.

Once you have PHP installed, you can test it.  You can use a simple file such as phpinfo.php in your wwwroot directory containing the following:

<html>
<body>
<?php phpinfo(); ?>
</body>
</html>
Posted in PHP | Tagged , | Leave a comment